-
Go to menu
The Merge wizard is opened:
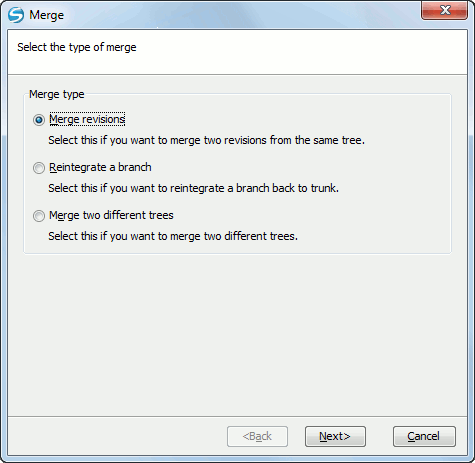
The Merge Wizard - The Merge Type
- Select the option Merge revisions.
-
Press the Next button.
The second step of the Merge wizard is displayed:
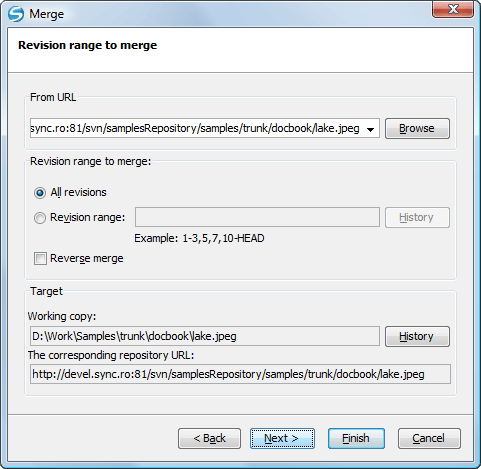
The Merge Wizard - Revisions Range
- In the From URL field enter the folder URL of the branch or tag containing the changes that you want to port into your working copy. You may also click the Browse button to browse the repository and find the desired branch. If you have merged from this branch before, then just use the drop down list which shows a history of previously used URLs.
-
Select the revision range.
-
Choose between all revisions and a revision range.
In the Revision range to merge section you can choose to merge all revisions or enter the list of revisions you want to merge in the Revision range field. This can be a single revision, a list of comma separated specific revisions, or a range of revisions separated by a dash, or any combination of these.
The History button opens the the History dialog which allows selecting the list of revisions to be merged in the easiest way. One or several revisions can be selected in that dialog.
Be careful about using the HEAD revision. It may not refer to the revision you think it does if someone else made a commit after your last update.
-
Check the Reverse merge box (optional).
If you want to merge changes back out of your working copy, to revert a change which has already been committed, select the revisions to revert and check the Reverse merge box.
-
Choose between all revisions and a revision range.
-
Specify the target where the changes of the branch will be integrated.
-
Enter the working copy folder in the Working copy
field.
By default the root folder of the current working copy from the Working Copy view is set in this field.
If you have already merged some changes from this branch and you remember the last merged revision, you can select that revision for the working copy using the History button. For example, if you have merged revisions 27 to 33 last time, then the start point for this merge operation should be revision 33.
-
Specify the URL of the target branch that will receive the changes.
By default the URL of the repository of the current working copy from the Working Copy view is set in this field.
Subversion has merge tracking features and automatically records the last merged revision so you do not need to remember when you performed the last merge.
-
Enter the working copy folder in the Working copy
field.
-
Press the Next button.
The Merge Options step of the wizard is opened:
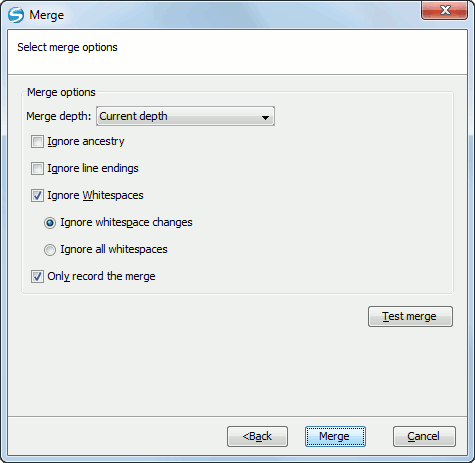
The Merge Wizard - Advanced Options
-
Set advanced options if necessary before starting the merge process.
-
Set the depth of the merge operation in the Merge depth
combo box.
You can specify how far down into your working copy the merge should go by selecting one of the following values:
- Current depth
- Recursive (infinity)
- Immediate children (immediates)
- File children only (files)
- This folder only (empty)
The depth term is described in the Sparse checkouts section. The default depth is the depth of the current working copy.
- Check the Ignore ancestry checkbox (optional). The Ignore ancestry checkbox allows a merge to be applied between a branch and the trunk or between two branches even if they do not share a common ancestry. Normally the branch and the trunk or the two branches that are merged must have a common ancestor revision in the same repository. In case the two merged trees were imported in the repository they are not related in the sense of a common ancestor tree and the merge operation is possible by ignoring the missing common ancestry of the two merged trees.
- Check the Ignore line endings checkbox (optional).
- Check the Ignore Whitespaces checkbox (optional). The Ignore line endings and Ignore whitespaces checkboxes allow you to specify how the line endings and whitespace changes should be handled. If they are checked the changes due only to the line endings and whitespaces are ignored. The default behavior is to treat all whitespace and line-end differences as real changes to be merged. Ignore whitespace changes excludes changes which are caused by a change in the amount or type of whitespace, for example changing the indentation or changing tabs to spaces. Adding whitespace where there was none before, or removing a whitespace completely is still shown as a change. If Ignore all whitespaces is checked all whitespace-only changes are excluded.
- Check the Only record the merge checkbox (optional). If you are using merge tracking support and you want to mark a revision as having been merged, without actually doing the merge here, check the Only record the merge checkbox. You might want to do this for two possible reasons. You make the changes by hand, then mark the change as merged so that the merge tracking algorithm is aware of it. Or you might want to prevent a particular revision from being merged by marking it as already merged. This will prevent future merging.
- Press the Test merge button (optional). By pressing the Test merge button you do a dry run of the merge operation in order to see what files are affected and how without modifying the working copy at all. This is very helpful in detecting where conflicts may occur.
-
Set the depth of the merge operation in the Merge depth
combo box.
- Press the Merge button. The merge operation is executed.
-
Optionally resolve the conflicts that were created by the merge operation.
After the merge operation is finished it is possible to have some resources in conflict. This means that some incoming modifications for a resource could not be merged with the current modifications from the working copy. If there are such conflicts, the following dialog will appear presenting you the resources that are in conflict. In this dialog you can choose a way in which every conflict should be resolved.
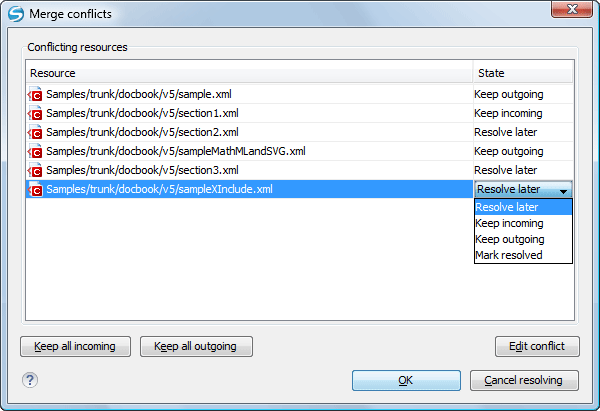
Merge Conflicts Dialog
The options to resolve a conflict are:
- Resolve later - Used to leave the conflict as it is for manual resolving it later.
- Keep incoming - This option keeps all the incoming modifications, discarding all current ones from your working copy.
- Keep outgoing - This option keeps all current modifications from your working copy, discarding all incoming ones.
- Mark resolved - You should chose this option after you have manually edited the conflict. To do that, use the Edit conflict button, which will bring to you a dialog presenting the conflicting resource's content for current working copy version and the one with the incoming modifications. After manually resolving the conflict, the resource will be marked as resolved.