Merge Two Different Trees

This is a general case of the reintegrate method. You can consider the following example: calculate the changes necessary to get (from) the HEAD revision of the trunk (to) the HEAD revision of the branch, and apply those changes to my working copy (of the trunk). The result is that trunk will be identical with the branch.
Note: If the server does not support merge-tracking then this is the only way to merge a branch back to trunk.
  1. Go to menu Tools > Merge ...
    The Merge wizard is opened:

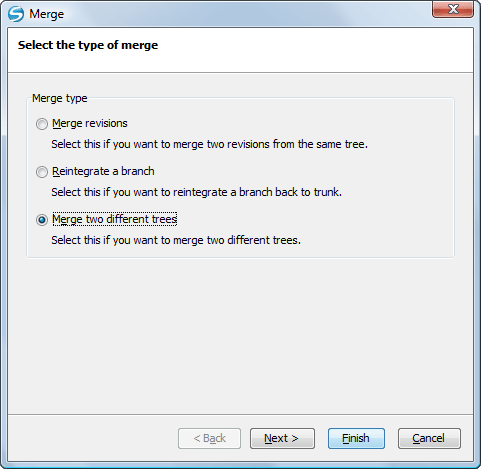
    The Merge Wizard - The Merge Type

  2. Select the option Merge two different trees.
  3. Press the Next button.
    The second step of the Merge wizard is displayed:

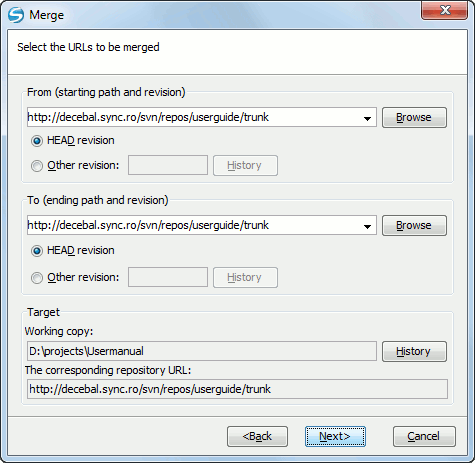
    The Merge Wizard - Merge Two Different Trees

  4. Specify the URL of the first tree in the From field.

    If you are using this method to merge a feature branch back to trunk, you need to start the merge wizard from within a working copy of trunk. In the From field enter the full folder URL of the trunk. This may sound wrong, but remember that the trunk is the start point to which you want to add the branch changes. In the To field enter the full folder URL of the feature branch.

    By default the start URL will be the URL of the selected file in the working copy. If you want to specify a different URL you should browse the repository and select a start URL and a revision.

    1. Select a URL in the From field.
    2. Select a revision of the repository from the From field.

      In the Revision field enter the last revision number at which the two trees were synchronized. If you are sure no-one else is making commits you can use the HEAD revision in both cases. If there is a chance that someone else may have made a commit since that synchronization, use the specific revision number to avoid losing more recent commits.

      By default the HEAD revision is selected. If you want a previous revision you have to select the Other revision option and press the History button to see a list of all revisions.

  5. Specify the URL of the second tree in the To field.
    1. Select a URL in the To field.
    2. Select a revision of the repository from the To field.
      By default the HEAD revision is selected. If you want a previous revision you have to select the Other revision option and press the History button to see a list of all revisions.
  6. Specify the target of the merge operation in the Target panel.
    The Target panel of the dialog reminds you the location of the target resource from the working copy where the merge result will be saved and its corresponding repository URL.
    1. Specify the working copy path in the Working copy field.
    2. Specify the repository URL corresponding to the working copy.
  7. Press the Next button.
    The Merge Options step of the wizard is opened:

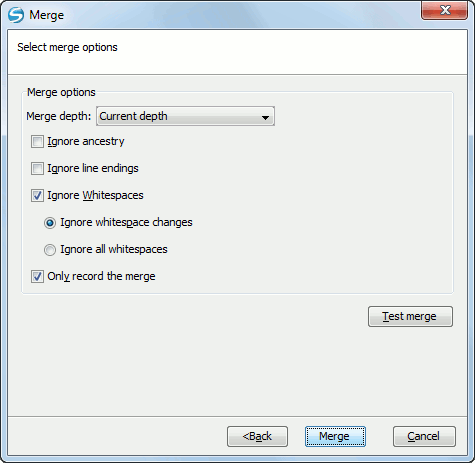
    The Merge Wizard - Advanced Options

  8. Set advanced options if necessary before starting the merge process.
    1. Set the depth of the merge operation in the Merge depth combo box.

      You can specify how far down into your working copy the merge should go by selecting one of the following values:

      • Current depth
      • Recursive (infinity)
      • Immediate children (immediates)
      • File children only (files)
      • This folder only (empty)

      The depth term is described in the Sparse checkouts section. The default depth is the depth of the current working copy.

    2. Check the Ignore ancestry checkbox (optional).
      The Ignore ancestry checkbox allows a merge to be applied between a branch and the trunk or between two branches even if they do not share a common ancestry. Normally the branch and the trunk or the two branches that are merged must have a common ancestor revision in the same repository. In case the two merged trees were imported in the repository they are not related in the sense of a common ancestor tree and the merge operation is possible by ignoring the missing common ancestry of the two merged trees.
    3. Check the Ignore line endings checkbox (optional).
    4. Check the Ignore Whitespaces checkbox (optional).
      The Ignore line endings and Ignore whitespaces checkboxes allow you to specify how the line endings and whitespace changes should be handled. If they are checked the changes due only to the line endings and whitespaces are ignored. The default behavior is to treat all whitespace and line-end differences as real changes to be merged. Ignore whitespace changes excludes changes which are caused by a change in the amount or type of whitespace, for example changing the indentation or changing tabs to spaces. Adding whitespace where there was none before, or removing a whitespace completely is still shown as a change. If Ignore all whitespaces is checked all whitespace-only changes are excluded.
    5. Check the Only record the merge checkbox (optional).
      If you are using merge tracking support and you want to mark a revision as having been merged, without actually doing the merge here, check the Only record the merge checkbox. You might want to do this for two possible reasons. You make the changes by hand, then mark the change as merged so that the merge tracking algorithm is aware of it. Or you might want to prevent a particular revision from being merged by marking it as already merged. This will prevent future merging.
    6. Press the Test merge button (optional).
      By pressing the Test merge button you do a dry run of the merge operation in order to see what files are affected and how without modifying the working copy at all. This is very helpful in detecting where conflicts may occur.
  9. Press the Merge button.
    The merge operation is executed.
  10. Optionally resolve the conflicts that were created by the merge operation.

    After the merge operation is finished it is possible to have some resources in conflict. This means that some incoming modifications for a resource could not be merged with the current modifications from the working copy. If there are such conflicts, the following dialog will appear presenting you the resources that are in conflict. In this dialog you can choose a way in which every conflict should be resolved.

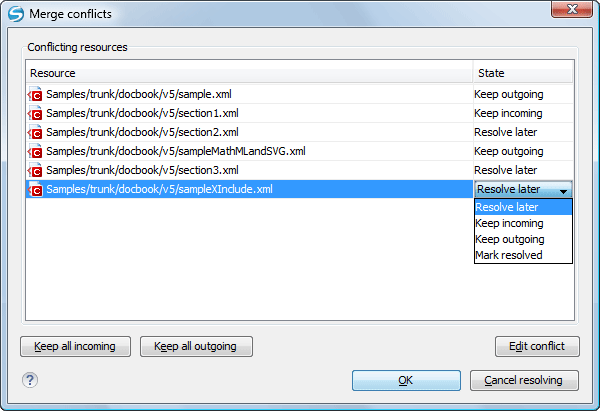
    Merge Conflicts Dialog

    The options to resolve a conflict are:

    • Resolve later - Used to leave the conflict as it is for manual resolving it later.
    • Keep incoming - This option keeps all the incoming modifications, discarding all current ones from your working copy.
    • Keep outgoing - This option keeps all current modifications from your working copy, discarding all incoming ones.
    • Mark resolved - You should chose this option after you have manually edited the conflict. To do that, use the Edit conflict button, which will bring to you a dialog presenting the conflicting resource's content for current working copy version and the one with the incoming modifications. After manually resolving the conflict, the resource will be marked as resolved.